
Line of Sight
Line of sight (LOS) is a concept that will be frequently encountered in this essay. Therefore, a brief explanation is warranted.
LOS exists between 2 points if no intervening terrain exists between them. Figure X.1 illustrates this concept.
|
| Figure X.1 |
In figure X.1, an observer stands at point 'A' and is looking in the direction of point 'E'; intermediate points 'B', 'C', and 'D' also fall in the same line. Above and to the right of the line between 'A' and 'E' is a projection of the profile of the terrain between these 2 points. A profile is a 'cut-away', or side view of the ground which shows the variations in the elevation1
 |
| Figure X.2 |
The profile from Figure X.1 has been reproduced in Figure X.2, with rays drawn between point 'A', and each of the points 'B', 'C', 'D', and 'E'. From this profile, it would appear that points 'C' and 'E' are visible from 'A', since the rays 'AC' and 'AE' do not cut through any intervening terrain. On the other hand, it would appear that points 'B' and 'D' are not visible from 'A', since the rays 'AB' and 'AD' do cut through intervening terrain.
To get the complete picture of what is and what is not visible along the line 'AE', we repeat the basic process of drawing a ray from 'A' to every point between 'A' and 'E' (not just the discrete points 'B', 'C', 'D', and 'E'), and determining if the ray intercepts any intervening terrain.
The process of determining if any terrain blocks the ray between any 2 arbitrary points can be performed by a GIS.
 |
| Figure X.3 |
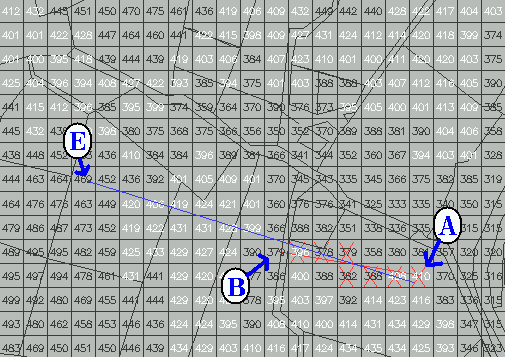
Figure X.3 shows the region around line 'AE'. The region shown has been divided up into its component GIS cells. Each cell contains a number which represents the average height of the cell. The cells which correspond to points 'A', 'B', and 'E' from our example have been indicated. For this illustration, the cell size has been chosen to be extraordinarily large (50 meters to a cell side) so that it would be possible to read the cell values. In a real GIS LOS calculation, the cell size would be chosen to be much smaller, typically 2 to 10 meters to a side.
Referring back to Figure X.2, the method to determining if there is intervening terrain is a two step process:
Note that the observer can be assumed to be standing, so the distance between the ground and the observer's eyes should be added to the height of the observation cell. Likewise, a presumed target also has some height, and this value should be added to the endpoint cell's value. Unless otherwise noted, all LOS calculations in this essay assume an observation height of 6 feet, and a target height of 5 feet. This assumes the target is upright, not prone. LOS calculations therefore err on the side of optimism; it is possible that LOS concludes an observer and a target do have LOS, when in fact, if the target were lying on the ground, they would not.
Referring back to Figure X.3, 'A', the observation cell, has a value of 410, and 'B', the endpoint cell, has a value of 379. Therefore, the slope between 'A' and 'B' (accounting for respective observer and target heights) is calculated to be:
| slope = | rise | = | (379 + 5) - (410 + 6) | = | -32 | = -5.261 |
| run | square_root(12 + 62) | 6.0828 |
Note the calculated slope is negative, which is consistent with the ray 'AB' in Figure X.2 depicted as looking downhill.
Again referring back to Figure X.3, a red line is drawn between the centers of the observation cell and the endpoint cell. Each intermediate point on this line is marked with a red 'X'. With respect to step 2 above, the slope of the ray from the observation cell to each of these cells must be calculated. Assuming cells are numbered left to right, top to bottom, and the uppermost left corner is numbered (0,0), the slopes of these intermediate points are found to be:
| Observation Cell | Intermediate Cell | Cell Value |
Rise | Run | Slope | ||
| Column | Row | Column | Row | ||||
| 17 | 11 | 16 | 11 | 408 | -8 | 1 | -8 |
| 17 | 11 | 15 | 11 | 388 | -28 | 2 | -14 |
| 17 | 11 | 14 | 11 | 382 | -35 | 3 | -11.33 |
| 17 | 11 | 14 | 10 | 379 | -37 | 3.16 | -11.70 |
| 17 | 11 | 13 | 10 | 378 | -38 | 4.12 | -9.22 |
| 17 | 11 | 12 | 10 | 396 | -20 | 5.10 | -3.92 |
Note that when we get to intermediate cell (12,10), the slope of the ray from the observation cell to this cell is -3.92, which exceeds the observation/endpoint cell slope of -5.261. Therefore, this intermediate cell blocks the LOS between 'A' and 'B'.
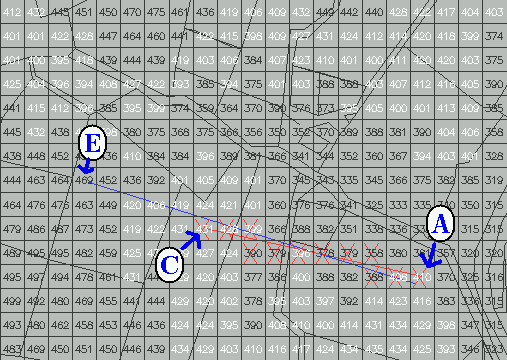 |
| Figure X.4 |
In Figure X.4, we repeat the same procedure for endpoint 'C'. According to Figure X.4, 'A', the observation cell, has a value of 410, and 'C', the endpoint cell, has a value of 431. Therefore, the slope between 'A' and 'B' (accounting for respective observer and target heights) is calculated to be:
| slope = | rise | = | (431 + 5) - (410 + 6) | = | 20 | = 2.169 |
| run | square_root(22 + 92) | 9.22 |
Note that this time, the calculated slope is positive, which is consistent with the ray 'AC' in Figure X.2 depicted as looking uphill.
Again referring back to Figure X.4, a red line is drawn between the centers of the observation cell and the endpoint cell. Each intermediate point on this line is marked with a red 'X'. The slope of the ray from the observation cell to each of these cells must be calculated. The slopes of these intermediate points are found to be:
| Observation Cell | Intermediate Cell | Cell Value |
Rise | Run | Slope | ||
| Column | Row | Column | Row | ||||
| 17 | 11 | 16 | 11 | 408 | -8 | 1 | -8 |
| 17 | 11 | 15 | 11 | 388 | -28 | 2 | -14 |
| 17 | 11 | 15 | 10 | 358 | -58 | 2.24 | -25.94 |
| 17 | 11 | 14 | 10 | 379 | -37 | 3.16 | -11.70 |
| 17 | 11 | 13 | 10 | 378 | -38 | 4.12 | -9.22 |
| 17 | 11 | 12 | 10 | 396 | -20 | 5.10 | -3.92 |
| 17 | 11 | 11 | 10 | 379 | -37 | 5.10 | -6.08 |
| 17 | 11 | 10 | 10 | 390 | -26 | 7.07 | -3.68 |
| 17 | 11 | 10 | 9 | 399 | -17 | 7.28 | -2.34 |
| 17 | 11 | 9 | 9 | 428 | 12 | 8.25 | 1.46 |
In this case, we successfully traverse each intermediate cell without exceeding the endpoint slope of 2.169. We can conclude that point 'C' has LOS with 'A'.
 |
| Figure X.5 |
In Figure X.5, the profile from Figure X.2 has been redrawn, but with all ground which is not visible shaded grey. As predicted, 'B' and 'D' are within ranges on the line 'AE' which are not visible from 'A'; 'C' and 'E', however, are within ranges on 'AE' which are visible.
 |
| Figure X.6 |
Using the principals outlined above, it is possible to determine if any two points have LOS. In Figure X.6, all points within 900 meters of 'A' have had their LOS determined. Those which have LOS are shaded normally; those which do not have been shaded grey. Points farther than 900 meters have been shaded a darker grey.
Because this type of LOS is done with respect to a specific point, it is more properly referred to as viewpoint LOS analysis. Obvisouly, to carry out such an analysis one needs to select a specfic point that has some special significance. A more general approach which will be considered shortly, is viewregion LOS, where the LOS of points on a map is determined with respect to a collection of viewpoints.
LOS maps are useful because they illustrate exactly what ground is viable from any arbitrary point. Some other useful applications of LOS maps will be demonstrated in later lesions.