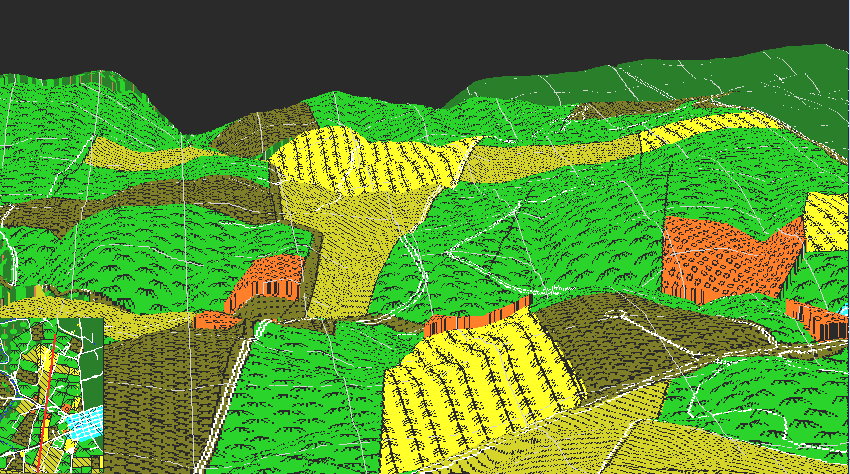
This spectacular view illustrates what the IX corps was up against. We are looking a little west of south, onto the Sherrick and Otto farms. In the center on the extreme left, one can see the modern road leading to the Park's Burnside Bridge parking loop, which is located in what was a stubble field. The fields in the lower left corner of the image are those of the Sherrick farm. Just across the Rohrbach (or Lower) Bridge road - which is only visible at a few points owing to its low elevation - is the Otto farm, with its orchard, its large plowed field, and the 40 acre cornfield (Otto's plowed field and the 40 acre cornfield dominate the center of the image). The Antietam National Cemetery now occupies the large stubble field toward the lower right. The modern road which cuts through it and ends in a circle is the footpath through the cemetery. Only a tiny blue sliver of Sharpsburg is visible on the extreme right. The Harper's Ferry road is also on the right, running along the edge of the defined map. An orientation map is in the lower left of the image; the red line indicates the line of sight.
The mission of the IX corps was to move from a front roughly along the left edge of the image, advance across these fields to the Harper's Ferry Road, swing north to take the town, and thus the Confederate position, in flank. In order to overlap the Confederate line, the Union line reached all the way from the Sherrick orchards to the 40 acre cornfield.
The terrain here worked much to the benefit of the Confederates. As can be seen, the high ground is to the left and right. In between, there are two long depressions - one along Otto's plowed field and the other just to the west - that run north-south. Each depression provided low ground for the defenders to fire into. To make matters worse, stone walls provided cover for the Confederates. One wall ran along the western boundary of Otto's plowed field, and the other along the eastern boundary of the large orchard on the center right of the image.
Because the Union troops so outnumbered the Confederates, the defenders could not stop the Union drive. The Union progress was, however, quite costly. For each ridge taken, then next proved even more difficult. Furthermore, the Union troops had to contend with Confederate artillery positioned on at what is now the National Cemetery and along the Harper's Ferry Road.
Despite these obstacles, the Union drive was unstoppable. The Union line drove across these fields until they reached the line of the stone fence along the left edge of the large orchard on the right of the image. Hawkin's Zouaves Monument, the traditional site of the Union's farthest advance, is located on this stone fence. As the Federals stopped to catch their breath, Confederate reenforcements from Harper's Ferry caught the Union left (south) flank in complete surprise. With the Federal left flank falling back in confusion, the Federal right flank was obligated to follow. When the fighting for the day closed, the Union line had withdrawn back to the high ground overlooking the Lower Bridge, along the left edge of this image.