How to View Stereo Images
Human vision perceives depth of field of view by comparing the images from both eyes--each at a slightly different vantage point--and identifying the parts of the scenes which are the same and which parts are different. From this information, the brain can determine which parts of the scene are closer and which are farther. The result is the sense of depth perception.
Stereoscopy--the science of creating artificial images that have depth--works by providing 2 images (called a stereo pair) and presenting 1 of them to only 1 eye, and the other image to the other eye. If the two images in the stereo pair have been constructed such that 1 of them depicts a scene as it would appear from a certain vantage point, and the other depicts the same scene from a vantage point a few inches to the left or right of the first, then when each image is presented to 1 eye, the result will be a full 3-dimensional image with depth.
|
|
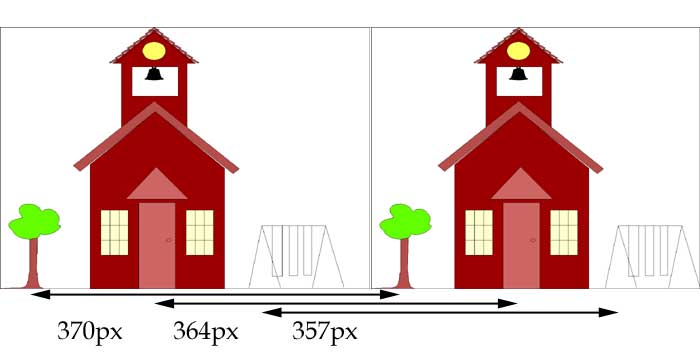
| Figure 1 |
In Figure 1, we see a stereo pair of a simple scene containing 3 objects: a tree, a schoolhouse, and a swing set. At first glance, the two images seem identical. On closer inspection, however, the 3 objects are displaced slightly relative to each other: the trees are about 370 pixels apart, whereas the schoolhouses are only 364 pixels apart, and the swing sets are 357 pixels apart. By basic geometry, a comparison between two images of a scene from different vantage points reveals that objects in the foreground will shift relative to objects in the background. For the stereo pair in Figure 1, the swing sets have shifted the most, so it is in the foreground; the schoolhouses have shifted to a lesser degree, so it is in the mid ground. By default, the tree will appear in the background. Below, we will explore how to view this stereo pair.
Perhaps the easiest way to generate a stereo pair is to take two photographs of a scene, both looking along the exact same axis but 1 displaced a slight distance (maybe a few inches, approximately the average distance between human eyes) from the other. The result is two nearly identical photographic images. When viewed properly by isolating the left most image to the left eye and the right most image to the right eye, the original scene is re-created. Matching each image to the respective eye can be performed by a simple viewer using lenses.
Techniques for viewing a stereo pair fall into 4 general categories:
As the name implies, the free viewing technique does not use any lenses or filters. The stereo pair are placed side by side and the viewer 'fuses' the images together by re-orienting their eyes. There are 2 variations on free viewing:
The advantages of Free Viewing is that no special viewer is needed, and it works fine for color images. The disadvantage is that free viewing take a certain amount of practice to master. Also, smaller sized images are easier to view than larger ones.
Anaglyph viewing uses simple colored lenses, usually red-cyan but sometimes red-green, or red-blue. The images in the stereo pair are tinted in such a way that 1 image is masked for each lens, so 1 eye only sees 1 image and the other eye sees the other image.
The advantage of anaglyph viewing is that it only requires very simple inexpensive glasses, often made out of paper. Size of the image is not a factor. The disadvantage is that because the technique depends on tinting the images, it interferes with their natural colors; color images don't look quite right. Anaglyph viewing works extremely well with black and white photographic images.
A variety of anaglyph glasses including FREE (yes, FREE) glasses can be found from the following sources.
The Holmes viewer was the ubiquitous viewing technique throughout stereo photography's heyday in the nineteenth century. The Holmes viewer uses magnifying lenses to fuse parallel side by side mounted stereo pairs. The classic Holmes viewer holds a 7" by 3" card mounted with the stereo pair and contains a siding arm for focusing.
The Holmes viewer is easy to use, works for color stereo pairs as well as black and white. Countless numbers of Holmes stereo cards can be found today in antique stores and flea markets. All Civil War stereoviews were originally published as Holmes style stereo cards. Since a Holmes stereo viewer is designed to have a stereocard inserted in it, it is not suitable for on-line images displayed on a computer monitor. In principal, however, the use of magnifying lenses in the Holmes viewer is really nothing more than an aid to parallel free viewing. With a little practice, on-line parallel side by side images can be fused with 2 identical magnifying glasses.
In practice, high quality (i.e., high resolution images) work best with Holmes style viewing, for the simple reason that the images are magnified by the lenses; any kind of dithering used in low quality printing will be obvious, as will scan lines on a computer monitor and dots composing an image generated on on ink jet printers. For this reason, viewing techniques that use magnifying glasses work best on true photographic images.
Shutter glasses are special glasses that work in conjunction with special computer graphic cards. Shutter glasses give awe-inspiring results, but only work on computer images and then only with special hardware.

|
The images presented in these galleries use a special tool that allows the user to select the viewing technique that the image is displayed as. The "Stereoscope Applet" is a simple Java applet that runs in your browser and only requires the Java Plug-in installed on your computer. See the link to the left for more information from the provider of the Stereoscope Applet. |
Simple pull down menus select among the various viewing mode, including parallel, cross eyed, anaglyph and shutter glasses. A number of other display options are available, including the size of the image presented.
Figure 1 is reproduced below as Figure 2 using the Stereoscope applet. Simply click on the image to bring up the applet.
| Figure 2 |
Note: Some versions of Windows require the absolute latest version of the Java Plug-in. If you are running Windows and are unable to view the applet labeled 'Figure 2', consider downloading the lastest version of the Java Run-time environment: goto the Java Download Page and download "Java Runtime Environment (JRE) 6u1".
| Back to the Antietam 3-D Page | || | Back to the "Antietam: A photographic Tour" page |